How I Change My Urostomy Bag
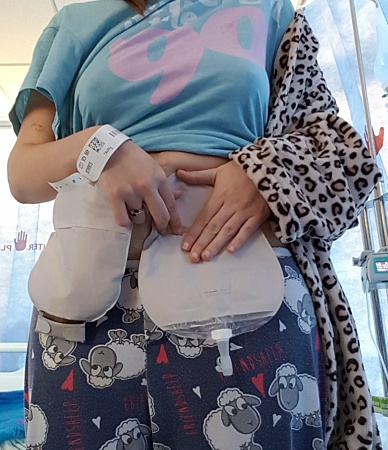
In my experience, there isn’t much information available online advising how to change a urostomy bag, so I thought I would post pictures and write about how I change mine to help guide others. I’m currently in hospital at the moment, so please excuse the pj pictures and hospital wrist bands!
Due to being a ‘double bagger’ (which means I have both an ileostomy and a urostomy), one of the first issues I experienced was knowing which bag is best to change first. My Stoma Care Nurses advised me to always change my urostomy pouch first, then my ileostomy pouch, to ensure there is no cross-contamination of faeces which could cause kidney infections.
Step 1
Preparation, preparation and more preparation. I make sure to have everything out and ready, usually near my sink. This includes:
- Dry wipes
- Black bag
- A damp dry wipe
- My pouch where I cut the hole myself
- Adhesive spray
- Skin barrier wipe if my skin is sore
- Barrier ring
- Base Plate Extenders

Step 2
Spray the medical adhesive remover around your urostomy. If you are a double bagger and don’t want to change your second pouch, be careful that the spray doesn’t go on to the second pouch too.

Step 3
Peel the base plate off and place the used pouch in your black bag. Use a damp wipe to clean around the stoma, checking if the skin is ok and wiping off any excess urinary deposits or mucus build up. With a urostomy, because the conduit is often made from a piece of small bowel, there might be mucus in your pouch.
Step 4
Dry the area with a dry wipe. I usually use one hand to hold a dry wipe around my stoma to catch any output if it is active, and the other hand to dry the area around my stoma with an additional dry.

Step 5
Not everybody uses a barrier spray or wipe but, if you do, apply it to the skin surrounding your stoma. I personally ‘waft’ the area with my hand to make sure it is bone dry. Some people may also use powders at this stage if they have sore skin.

Step 6
Recently I have started using a barrier ring and convex pouch due to my urostomy retracting, to try and prevent leaks. However, not everybody gets on with the rings and this is usually a decision made with your Stoma Care Nurse. If you do use a barrier ring, this is when you apply it.

Step 7
Peel the film off the base plate and carefully place it, snug around your stoma. After a while this becomes second nature, but when you first get your urostomy you need to keep measuring and checking your stoma as it may change shape. It is important that the fit is snug because if there are any gaps it could cause leaks and consequentially sore skin. Once the urostomy bag is on, remember to check the bung is in or the tap is off so you don’t end up accidently wet in a few minutes. I normally go over the base plate with a dry wipe to check all is sticking well and then leave my hand there for a few seconds to make sure the adhesive sticks firmly.

Step 8
Now clean up your pouch changing area, dispose of the used urostomy bag and there you have it - a quick and simple bag change for a urostomy. Everyone is different and changing any type of stoma bag is slightly different from ostomate to ostomate, but in time you will find a routine that works best for you.
Share this article: